
INSTA360 ONE X2 SETUP
We know you are in a hurry to start your capture, but you will need to go through a quick and painless device setup process to get the easiest and best capture experience!
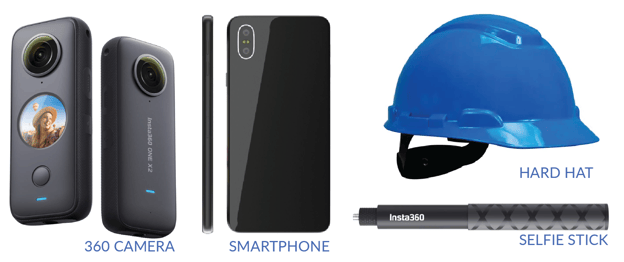
STEP 1: EQUIPMENT CHECK
- 360 camera – 100% charged
- Smartphone device handy
- Camera Mounting Options (What works best for you!)
- Selfie stick
- Hardhat with camera mount
- Protect your lens when not in use
- Keep your lens clean
STEP 2: INSTALL THE RECONSTRUCT CAPTURE APP
Install the iOS or Android app by scanning the QR Codes with a smartphone camera.

STEP 3: INSTALL THE 360 CAMERA DEVICE APP
Install the app by scanning the QR Codes above with a smartphone camera.

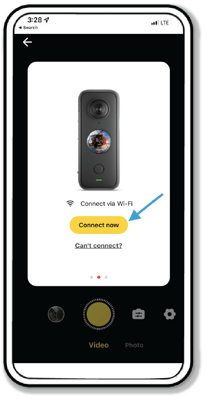
STEP 4: CAMERA ACTIVATION
- Turn on WiFi and Bluetooth on your smartphone.
- Press the power button to turn on your ONE X2 360 camera.
- Open the Insta360 App, tap the camera icon at the bottom of the app homepage and select “Connect now” in the WiFi panel. Then, choose your ONE X2 and follow the onscreen instructions to connect your device.
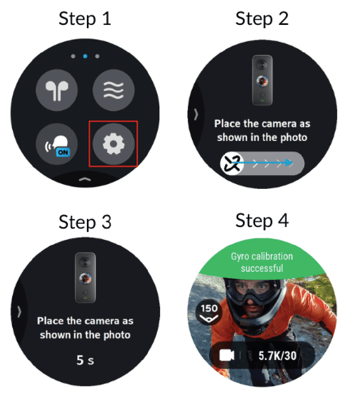
STEP 5: GYRO CALIBRATION (ONE TIME SET UP)
The Insta360 X2 Camera has been calibrated. Nonetheless, it’s good to recalibrate for best practices. Here are the steps:
- Press the power button to turn on your ONE X2. Swipe down to enter the Shortcut menu, swipe left to open the second page, then select Settings -> General Settings -> Gyro Calibration.
- Follow the onscreen instructions: First drag the confirmation bar to the right
- Then place the camera vertically on a flat, level surface. The indicator will flash green and blue during calibration.
- After calibration, ONE X2 will restart automatically.
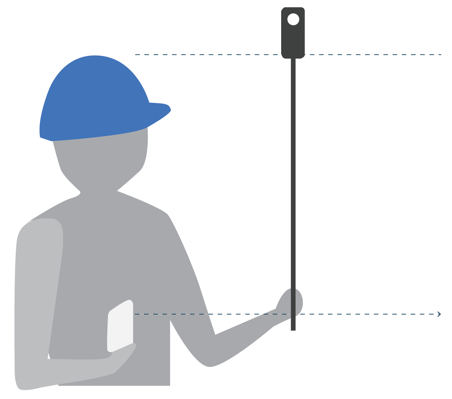
STEP 6A: SELFIE STICK OR GIMBLE MOUNT (OPTION 1)
Steps for best selfie stick captures:
- Pull-on the selfie stick handle and top to the telescope and elongate the selfie stick
- If the stick has a magnet in lieu of screw-in attachment. Place the magnetic mount and camera in the center of the metal disk attached to the top of the selfie stick.
- During capture, place the camera above your head. You may also use the selfie stick to extend outward for hard-to-reach places.
- When the capture is complete, remove the mount and camera, and store it in a protective case.
STEP 6B: MOUNT CAMERA ON HARDHAT (OPTION 2)
Hardhat mounts provide hands free operation, but require additional awareness with lower ceilings and doorways.
- 360 cameras can be mounted directly on a hard hat using a standard mount with an additional adapter.
- Reconstruct can also provide at an additional cost a magnetic mounting kit ( easier set up than Go Pro).

GENERAL NOTES
- Every time you remove the battery from your camera, you should connect the camera to your smartphone or tablet to make sure that it has the correct date.
- While the camera is recording, the indicator light will be flashing. Keep an eye out for the flashing light while recording to be aware of any camera mishaps ( e.g. out of battery).
- If the weather is extremely hot, the camera can overheat and shut down unexpectedly.
CONGRATS ON COMPLETING THE SETUP!
You are almost ready for your first capture, but first, plan your path of capture to maximize results!
Next: PLAN YOUR CAPTURE PATH.
Looking for Help?
Visit the Help Center or get in touch with the Customer Success Team.